 Rockriver.us
< PREVIOUS PAGE
NEXT PAGE >>
This next section will discuss what equipment I decided to buy, what it
cost me, and why I chose it.
As you could imagine, I did alot of calling around
to different
equipment vendors trying to decide what equipment to buy. Also in order
to get the North Carolina state tax write off and federal tax write
off, my installation has to meet State North Carolina code and pass
State inspection. I went down to Pittsboro and pulled a mechanical
permit (for
the tower) and an electrical permit (for solar and electrical install).
As far as the tower is involved, the inspection department had no
idea how to inspect it because their mechanical code books do not cover
towers so I will have to provide engineer stamped tower drawings from
A.R.E which they have already provided me. The project type was labled
gas backup generator which I thought was wrong but after asking the
inspection department about the miscategorization of my permit, they
said that it was the only category they had for that type of work.
The five biggest costs were:
- Inverters
- solar panels
- wind turbine
- wire
- batteries
Inverters:
I realized that many of the appliances in my home
needed 240 volts to run. For example, my electric dryer, my hot water
heater, range stove, well pump, 2 heat pumps all use 240 volts. Now
don't get me wrong,
it would be way too expensive for me to have an installation that would
actually run all these energy hungry appliances at the same time.
However, my idea is
that if we ever did loose the electric company's grid power, we would
at least
have the option to run any equipment that needed 240 volts individually
at our discretion. Not to
mention that if we did have a power outage I wanted to be able to run
my system as a backup to power any appliance in my house (assuming my
batteries had enough juice or if the wind was blowing hard enough for
the windmill to provide enough output) when the electric company's
grid was down, similar to how folks will use
gas generators to power their house during outages.
At the time, there
were no manufactureres who had an inverter that would do 240v on its
own, the usual case was to use two seperate inverters
(although in the last few months Xantrex came out with one that would
do 240v, the XW
series). The way they usually get 240v was to have 2 inverters that are
installed side by side and then a communication cable connects the two
and synchronizes the frequencies together to get synchronized 240v. I
went with Outback Power inverters. The reason I chose outback was for
two reasons. Firstly, the consultant I spoke with talked highly
of
them . Secondly, about 90 percent of the equipment dealers I called
recommended Outback over Xantrex and actually used Outback personally.
Other folks experience was good enough for me so I listened and went
with Outback. Also, Outback inverters are made in the U.S.A. I
purchased
my two inverters and flexware components from http://www.affordable-solar.com
. They have some pretty good prices. The inverters were $1688.00 each.
Solar panels:
As far as solar panels, I ended up going with
Evergreen Solar. The majority of folks I
talked too said they really liked the sturdiness of the aluminum
frames. After buying them I have to agree that the frames are sturdy
and can easily be screwed into with self tapping screws ( for custom
mounting as in my case) but the biggest selling point was the cost. I
was able to get (4) 190 watt Evergreen solar panels (ES-190-RL) from
http://www.affordable-solar.com
for $899
each. I only bought (4) panels
because that was all I could afford. Also, Evergreen panels are made
right here in the U.S.A. Evergreen panels were actually the cheapest I
could find
comparing all other brands and spending hours on the internet searching
for the best deal on panels.
**Panels
UPDATE** On October 1st 2008 I
purchased 12 more panels. Unfortunately I could not find any Evergreen
solar panels anywhere in the united States. I called probably 20
different dealers and no one can get them. Apparently Evergreen is
shipping all their panels to Europe because demand is so high. What I
ended up buying is (12) KD205GX-LP Kyocera 205 watt panels. The VMP or
VMPP (voltage-maximum power) on the Kyroceras is very close to my
Evergreen ES-190's. Its best to match the the VMP when mixing different
panels.
I bought the panels at www.wholesalesolar.com for $910 each with
shipping around $600 bucks. These panels were not put into service
until January of 2009.
Wind turbine:
With regard to the wind turbine
the first thing I would tell you is order it as soon as you can. This
will save you alot of headaches as far as getting on very long waiting
lists. Waiting on my wind turbine and tower parts have been the biggest
annoyance for me. I did alot of research and spoke with many folks on
turbines, quality, efficency, etc. I finally narrowed the list down to
"Proven" wind turbines out of Scottland or A.R.E (Abundant Renewable
Energy) out of Oregon. The Proven wind turbine seemed to
be a good choice. However shipping from Scottland was starting to look
like a bit of a headache and would cost alot as well. I eventually
ended up going with A.R.E. Their turbines are made in the U.S.A and I
felt that getting spare parts or possible returns would be easier than
getting service from overseas.
Since I wanted to have battery backup, I
opted for the A.R.E. 110 low voltage turbine (48 volt version, rated at
2.5 kw )
which could charge up my L16H trojan batteries (http://www.abundantre.com).
ARE's ( battery charging model) wind turbines
are the first in the industry (I believe) to
have a MPPT controller specifically for battery charging. Until now,
Mutil Power Point Tracking was
always associated with Solar panels or high voltage wind turbine grid
tie. Well not anymore!!! The
turbine still produces 3 phase wild AC like the high voltage
(non-battery charging- grid tie model), however the A/C voltages
are a bit lower. I
also needed a tower for the turbine. After reading a bit about
different towers, the majority of folks indicated that the biggest
mistake that turbine installers make is the tower is too short. Knowing
this I decided to buy the 106 foot (tilt up) tower straight from A.R.E.
- A.R.E 2.5 kw turbine cost (including ARE controller,
the Outback MPPT charge
controller, and
the diversion load ) was $8,870
- A.R.E. 106 foot tilt
up tower (include hardware, guy wires, everything for finished tower)
was $4400
- shipping was $1850
- ARE is currently the only wind turbine manufacturer in the world (I
believe) with a working Multi Power
Point Tracking controller for battery charging (low voltage) wind
turbines.
Their controller is specially made by Outback Power systems and is
called the windtracker 80 (a modified Flexmax 80) - Here is a link to
the manual- refer to page 6 and page 8 for references to the new
outback wind MPPT controller: http://www.abundantre.com/ARE110-48V_Owners_Manual_Electrical_Ver4.3.pdf
Wire:
The other large cost was wire. As you
can see I ended up needing about 1500 feet of #2 for the AC runs from
my house to the power station (a tin roof shack I built out of the
trees that we cleared to allow for the turbine) and using left over #2
for the 50 foot DC feeds from the solar panels to the power
station. Iwas able to get the wire for $1.18 per foot from Lowes
in June 2007 so about $1800 dollars. I checked prices the other day
12-20-07 and prices had jumped to $1.98, so copper prices have
gone up .80 cents already. I guess I was lucky getting it when I did. I
also needed 70 or so foot plus another 106 feet (to go up the turbine
tower) of 8-3 with ground UF (underground) cable for the turbine. The
UF cable was $2.45 a foot so about $450 bucks. I used UF because it was
quick and easy and very durable for going up the tower to the turbine
Yaw assembly. Also NEC code does not require it to be in conduit under
ground. Just dig a ditch and drop it in. I also bought around 12 feet
of 3/0 awg for connecting my (8) 6 volt trojan L-16-H batteries
in series to get 48volts and also for the positive and negative feed
from the batteries up to the main pos and neg busbar in the back of the
DC distribution panel. I'll get into DCand AC distribution later.

As
far as conduit
for the # 2 thhn wire between my house and the power station (tin roof
shack) is concerned, I referred to the NEC 2005 code Annex-C pg 70-704
to get 2" rigid PVC for #2 THHN type wire. 2" pvc supports up to 11
conductors. I only have six in this case (2 neutrals and four hots) but
wanted plenty of room in the pipe for pulling the wire. From the power
station to the panels I user 1" rigid pvc to support (2) #2 thhn wires
for positive and negative. Annex-C
pg 70-704 says max of (3) #2 wires in a 1" rigid pvc. When buying
conduit buy plenty of extra couplings, connectors, locknuts and glue.
I can't tell you how many trips I made to Lowes for that one connector,
coupling, or elbow that I forgot about. Keep your receipts and when you
are done just take the extra stuff back and get your money back.
Regarding the wire sizes. This was a little tricky in my situation.
Initially I was going to have the power station closer to the house
which would in turn reduce wire size, conduit size, etc. Then I thought
about the possibility of fire or battery hydrogen gases within the
power station. I figured that it is best to keep this away from the
house. Also, you have greater voltage drop with DC voltage than
you do with A/C voltage so having the A/C feeds go from my house all
the way out to the power shed is not a problem. If I had the D/C feeds
from the turbine and panels come all the way back to my house (assuming
now that the inverters and batteries are in my house now) then voltage
drop for the DC would be a big problem because wire size would be
enormous and the cost of the wire and conduit would go up greatly. My
idea was to have the power station
further from my house for saftey reasons and closer to the solar panels
to reduce DC voltage drop. In this case given the distance from my
house to the shack (200 feet)
I needed to figure out how many amps I really needed at a given time. When
you double your voltage you halve your amperage. So what wire size do I
need to go from my house to the power station ?
My
service entrance is 200 amps but I never use 200 amps. I estimated that
the maximum amps I would ever use at a given time would be 100 amps.
This would be the case of microwave, water pump, evaporator coil blower
unit, lights, shop tools, etc all going at the same time. So I need
100 amps right? Ok so I am going to have 2 outback inverters to give me
240 volts. Assuming I have my loads balanced across my backup panel's 2
hot busses this means I need to be able to draw from the inverter 50
amps per leg. But wait, the way the inverters work is this. When you
are grid tied (which in my case I am but with a battery backup) the
inverters synchronize with the grid. When you are using more power than
you produce from your solar or wind you draw power from the grid. In my
case if I were using more power than I produced I would draw power from
the grid but the actual distance the wire runs is this: Wires run from
the meter base to the grid tie panel->through 2" conduit across the
house--> out of the house through the ground to the shack-. into the
shack then into the inverters--> through the inverters internal
transfer switch--> out of the inverters back into 2" pvc
conduit-->into the ground back to my house across the house and into
my "backup panel" where all my branch circuit are. So, what I needed to
figure out was the voltage drop for 200 feet x 2. So voltage drop for a
400 foot run at 240 volts needing 50 amps turned out to be #2 with
3.33 % voltage drop. One thing I will note here is that the outback
inverters actually let you raise or lower the output voltage so
theoretically you could minimize voltage drop by raising the output
voltage. However, I am calculating voltage drop anyway and buying the
wire size accordingly as you normally would as extra assurance that the
wire size is sufficient for the load. Each outback inverters
internal transfer switch
can
handle a maximum of 60 amps, so 60 amps per inverter = 120 amps total
so long as my loads are balanced. The way I found my wire size was with
a handy dandy
voltage drop calculator. There are several on the internet and the one
I used can be found at http://www.mikeholt.com/technical.php?id=technicalvoltagedrop
In the case of both of my heat
pumps, the
electric dryer, water heater, electric range stove, these appliance's
circuits have been moved to the grid tie panel. This
essentially means
that in the case of a power failure I can't run these heavy load
circuits but I can still cook with the microwave and
get water with the well pump, light my house, use any receptacle in the
house, and run the single
evaporator coil blower unit to circulate heat from my woodstove
throughout my house.
The
reason for this is that if I left them on the backup panel (original
main panel) then they would draw alot of current through the inverters
possibly overloading them (each inverter is only good for 60 amps each
for passthrough voltage (passthrough voltage meaning the inverters
passing grid voltage through them over to the back up circuit/backup
panel). Also , If I lost grid power, I would have to run down to the
basement and turn off all the breakers for all the heavy load devices
out of fear that if something were left on then I would just suck
my batteries dry in a matter of hours, especially with the heat
pumps.
**Note about woodstove**
My wood stove is
basically a box inside of a
box (heat exchanger). The inside box is the firebox. The outside box is
the exterior of the whole unit and has two square 2 foot x 8 inch holes
on either side at the bottom for air to be drawn through across
the firebox. I cut another 12" hole in the return box of my
evaporator coil blower unit for the main floor of my house and
connected a 12 " piece of flex duct to it. I ran the 12" piece of
flex
duct down to where my wood stove is and transitioned to 12" stove pipe
which screws down to the top of the wood stove. I now have the ability
to turn the heat off on my thermostat (remember that heat pumps are on
grid tie panel and can't be run in power outage) but turn the fan
to "on". This
allows me to use the blower unit to draw air through my woodstove
-->> up the 12" duct --> through the evaporator coil
blower
unit--> and then out of the central duct system throughout my house.
In a power outage, so long as I have plenty of wood, I have central
heat since this blower is hooked up to my backup panel. The blower unit
is 240 volts (I have two inverters at 120 volts each -- sychronized
AC) and draws only about 2 amps between both hot legs so I can
run this all day with just the battery bank, or indefinitly if the wind
is blowing the turbine or the sun is
shining on my panels. The same goes for all my other "backup"
circuits. It's not uncommon for it to be 15 or 20 degrees outside and
80 degrees inside the house with the wood stove. Hot enough to open a
window or two in the middle of winter. Not bad for heating a 2400
sqaure foot house.
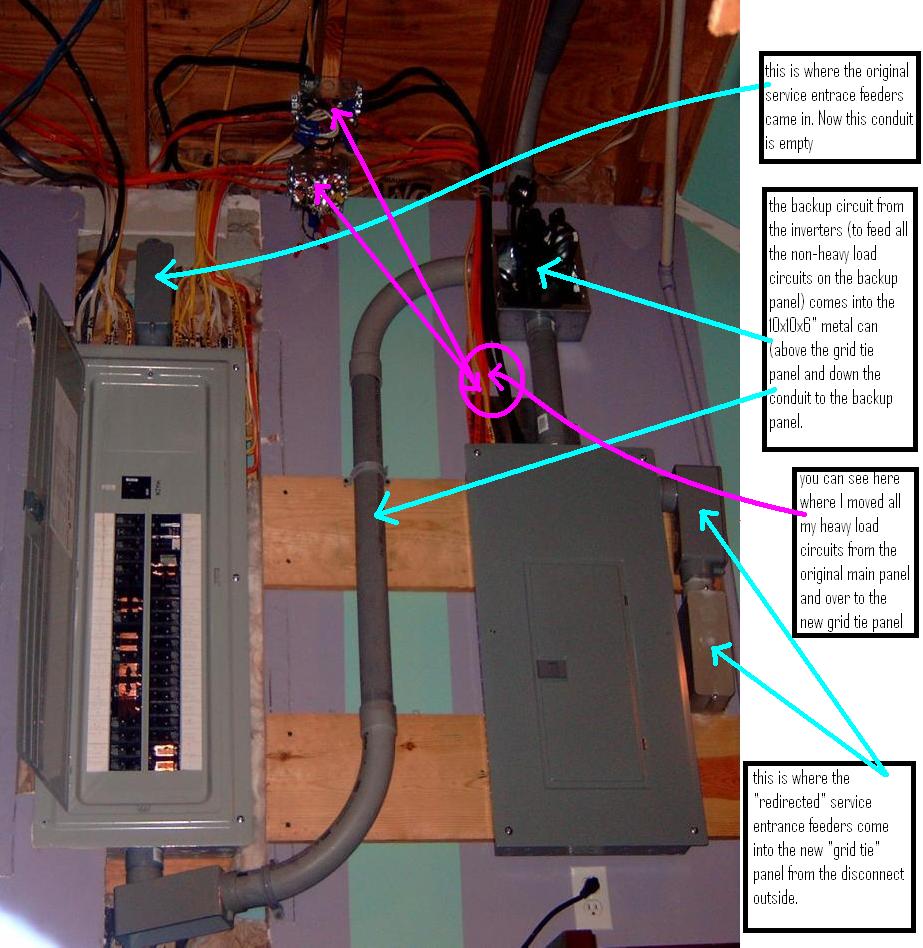
In the picture below you see two panels. My original panel is on
the left which is
now the backup
panel. The new grid
tie panel is on the right. I basically pulled the service entrance
feeders from the meter
outside and terminated them into the panel on the right (new grid tie
panel) Above the panels you see two metal
boxes which is where I made the splices for the heavy load circuits
that were moved out of the backup panel and into the new Grid tie panel.
The left panel is of course my original main panel (Siemens brand) and
the panel on the right is the "NEW" grid tie panel (SquareD brand) with
heavy load circuits and also a double pole 60 amp breaker that catches
the two 120 volt feeds (grid tie) from the two inverters out in the
power station. The grid tie panel is a 24 space 200amp panel and was
bought at lowes for $109. Fortunately the breakers from the siemens
panel on the left actually fits the Square D panel on the right so I
just pulled the breakers out on the left and plopped them into the
panel on the right and just moved the heavy load circuits onto those
breakers again. There was one exception. A double pole 50 and 60 amp
from
the Siemens panel would not fit the SquareD panel without - lets just
say some field modifications involving some lengthening of the slot on
the bottom of the breakers with a 1/4 in drill bit, so when shopping
around, take breaker/panel intercompatibility into account when looking
at different panels and breakers and planning for the future.
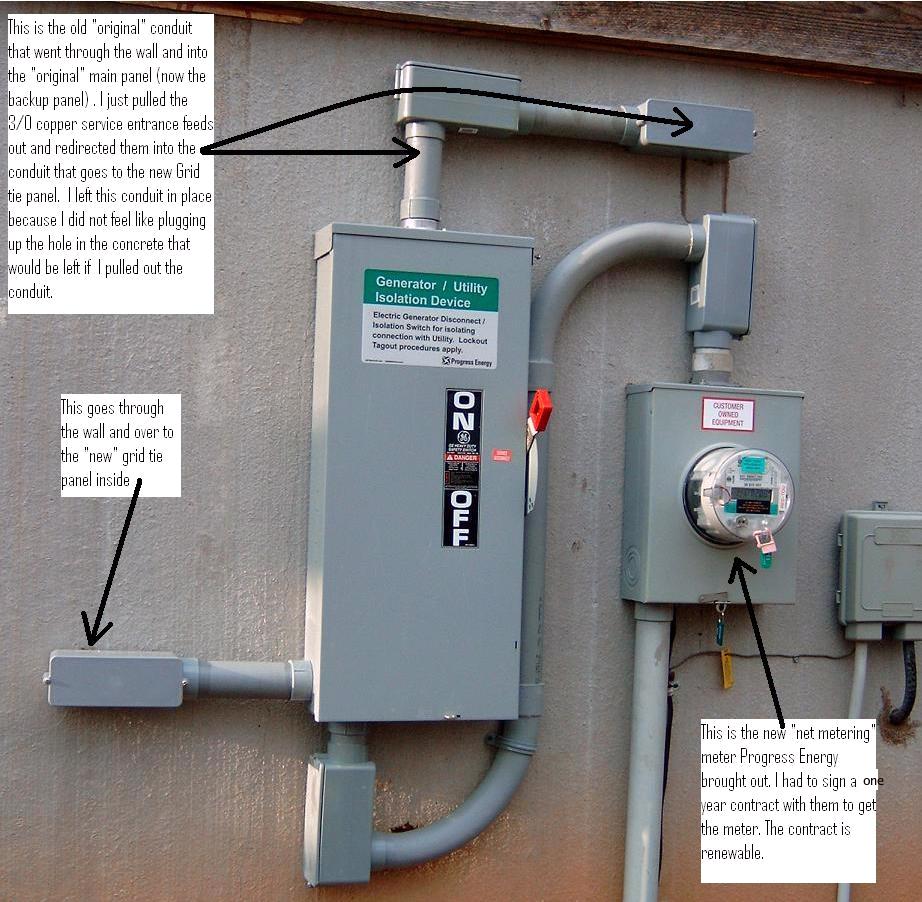
On the picture below, you will notice a sticker on the front of the GE
disconnect that says:
"Generator / Utility Isolation Device-- Electric generator Disconnect,
Isolation switch for isolating connection with Utility. Lockout Tagout
procedures apply"
This sticker was brought out by Progress Energy and stuck to the front
of my disconnect . The whole reason I have the disconnect in the first
place is because of the NEC code which requires a disconnect between
your meter and your "renewable energy source" aka the grid tie
circuit from the inverters that plugs onto a double pole 60 amp breaker
in the new grid tie panel. Remember, this whole installation has to
pass NC State electric code in order for me to legally grid tie to the
utility grid , get a net metering meter (even though they
actually
brought the meter out and installed it 6 months before I finally got it
inspected) , and of course the Federal and State government
wants me to have the install inspected before I can get that 35% tax
credit on my 2007 taxes and the 2000 bucks from the Feds.
As of February 4, 2007 I finally passed the mechanical and electrical
inspections and can now claim the State and Federal tax credit to help
pay for some
of this equipment (NC tax credit is 35% of install, fed is 30% or max
of $2000, Fed does solar but no wind, NC does credit for both
wind and solar). Here are a few links to info regarding the
North Carolina tax credit for Wind and Solar.
North Carolina Tax credit info:
http://www.dsireusa.org/library/includes/incentive2.cfm?Incentive_Code=NC20F&state=NC&CurrentPageID=1&RE=1&EE=0
http://www.dsireusa.org/library/includes/map2.cfm?state=NC¤tpageid=3
Federal tax credit info :
http://www.dsireusa.org/library/includes/incentive2.cfm?Incentive_Code=US37F&State=federal¤tpageid=1&ee=0&re=1
The mechanical part of the
inspection refers to the wind turbine tower. The inspectors have no
Idea how to inspect a tower so they requested engineer stamped drawings
from A.R.E.. They took the drawings no problem and that got me a
pass on mechanical.
The other interesting thing about this whole inspection deal is this.
When I first built my house I did not put in a disconnect between my
meter and my panel.
So when I called for inspection, I had to call Progress Energy and
schedule them to come and pull my meter out of its socket (and they
also turned
power off at the transformer - transformer is at the
road). After they pull your meter they will not put the meter back in
until you have passed inspection. Had I put in a disconnect when I
first built my house I never
would have had to call progress energy out to pull the meter because of
course I would have had a disconnect and could just kill power myself.
Having a
disconnect gives me the ability to kill power and thus do whatever I
want to and whenever I want. If I were in the middle of building
a house, I would go ahead and put in a disconnect now. It would make my
life
easier in the future.
Here is a document with the (TIME OF USE)
registers. If
you have a "time of use" TOU Meter, you can use this to figure out
what the registers mean.
I usually pay attention to registers 04, 44 (44 is not on
the document but means total KWH recieved), 45, 48, 52 and
55.
Time-of-use registers
Here is a link to Progress Energy's netmetering toolkit. At this link
you can download the application for Netmetering
(They charge $100 application fee)
in North Carolina as well as rules for interconnection
(inspection,installation policies,etc) . http://www.progress-energy.com/custservice/carres/renewables/netmetering.asp
and
http://www.progress-energy.com/environment/ras/carolinas.asp
To speak with someone directly about doing grid tie and netmetering
you can send email to customer.generation.pec@pgnmail.com
or renewablesinfo@pgnmail.com
Here is a shot of the grounding of the disconnect. What I did was had
one continuous ground (solid #4 copper) starting at the backup
panel-> following the 2"inch pvc conduit up to the 10x10x6 inch
metal can--> down into the grid tie panel and out the wall to the
outside and into this disconnect---> down the two inch conduit over
to the meter base enclosure.
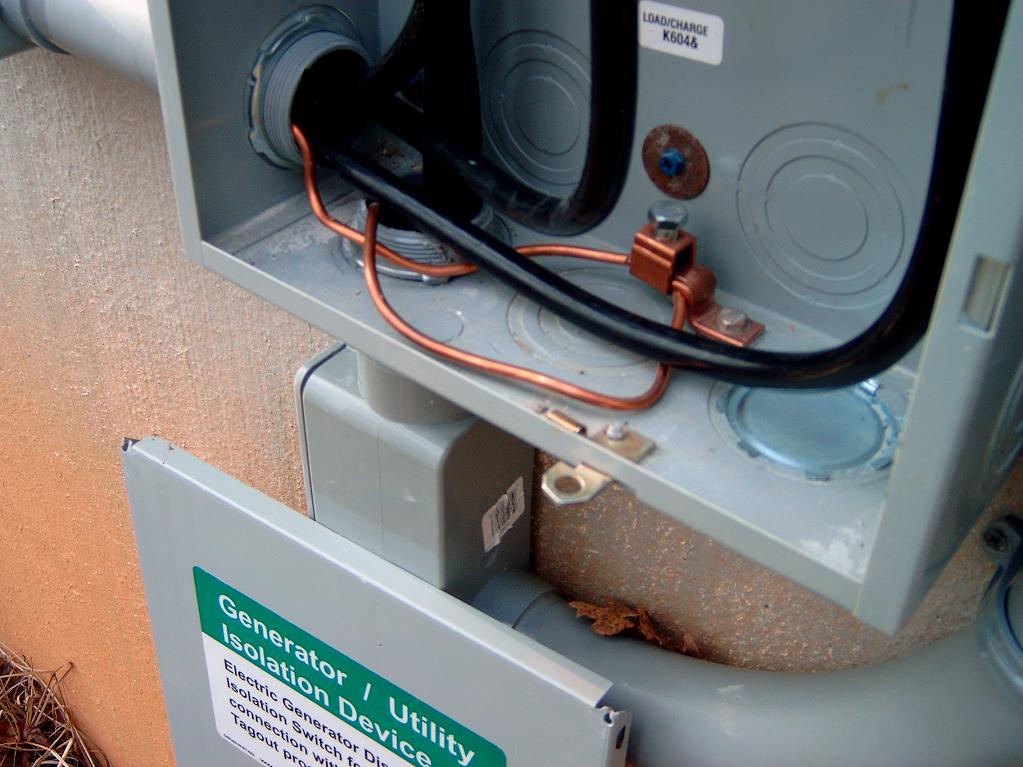
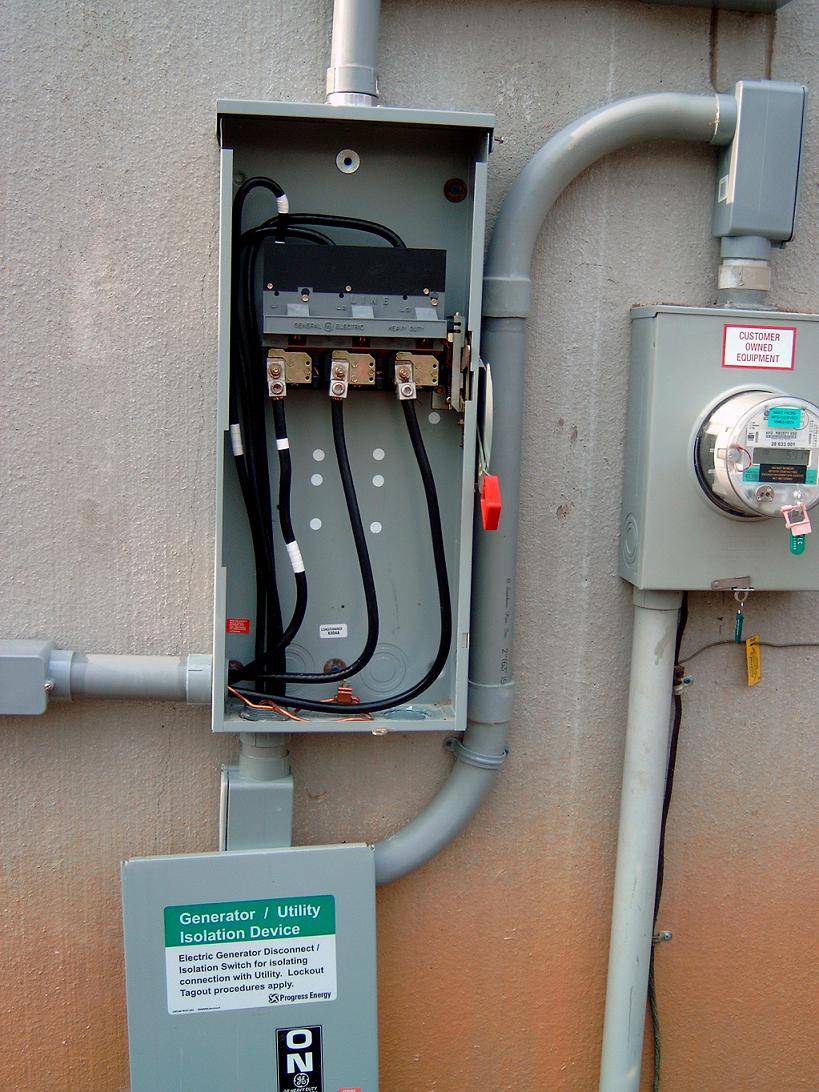
The
picture below is of the disconnect . I used 3/0 for the two
hots and also the neutral. Again the ground is #4 solid. Disconnect was
bought on ebay for about $250. Its probably a $650 dollar commercial
disconnect. This type of 200 amp Nema type 3R disconnect
could NOT be bought at Lowes or HomeDepot. Nema type 3R means rated for
outside/rainproof. Anything outside needs to ne type 3R to pass code.
My
first
thought during the inspection was - oh no, this
is a renewable energy install and most inspectors have no idea about
renewable energy anyway or how to properly inspect it so my chances of
failing might be higher since the inspectors could easily be " unsure,
confused, or I need to call my Electrician contacts to verify this" .
The honest truth is that renewable energy installs are pretty few and
far between in my area and the inspectors have very little experience
and exposure. Luckily Ipassed with no problem. The only thing the
inspector did say was that I needed to mark all my neutral feeds with
white tape. I missed a few but corrected them while he was there.
SOLAR
PANEL WIRES
The wire size for the circuit between the solar panels
and power station was oversized to #2 which it just so happened that I
had a good bit of #2 left over from the feeds between my house and
power station. I can easily add more panels later (up to 12 more
ES-190-RL's) and not overload the conductor capacity. Each panel
puts out about 30.5 (Voc) volts so I wired two panels in series to get
61 Voc
(for 48 volt system) and each set of two panel wired in parrallel which
then connect to a 15 amp breaker (used "midnight solar" brand PV
disconnect and breaker). The reason for the 15 amp breaker is this:
each evergreen solar panel is 190 watts. I have 4 total. 4 x 190w =
760w , 760w / 48v = 15.83333 so a 15 amp breaker is needed. I can
have up to 3 more sets of 4 evergreen panels which requires (3) more 15
amp breakers which gives a total amperage for the circuit (circuit
meaning the feed of (2) #2 wires from the shack to the Midnight
solar PV disconnect) of 60 amps.
All this DC amperage will connect into my Outback Solar MX-60 mppt
charge controller. The mx-60 has a maximum continuous amp capacity of
60 amps so this works out well. ONe thing about the outback MX60 is
that you can have PV voltage up to 135vdc (max) but on the output side
to the batteries, it can be configured for 24v,48v,or even 60v systems
. I have my MX60 output configure for 48vdc because I have my (8)
trojan 6volt batteries wired in series to get 48volts. Outback
Power provides a nice wire distance
chart in their MX-60 manual on page 10.
Here is an excerpt from that chart that applies to my scenario (48 volt
PV array):
| Amps |
#8
|
#6
|
#4
|
#2
|
#1/0
|
#2/0
|
#4/0
|
50
|
14 feet
|
22 feet
|
36 feet
|
58 feet
|
92 feet
|
116 feet
|
172 feet
|
60
|
12 feet
|
19 feet
|
30 feet
|
48 feet
|
77 feet
|
97 feet
|
154 feet
|
The distance between my panels and the MX-60 is about 50
feet so #2 works out fine as I work my way up to 60 amps in the future.
The wire size for the ARE turbine was arrived
at by following
the wire size recommendations in the A.R.E 110 (low voltage) wind
turbine manual. They have a nice chart with wire sizes for certain
distances.
Batteries
I ended up purchasing Trojan brand
L16H batteries. They have a 20 hour rated Amp hour capacity of 420 amp
hours and weigh about 125lbs each. I heard great things about their
quality and I was able to get them at a decent price of $230 each from Brads Golf Carts out
of Belows Creek N.C (5515 Reidsville rd.). Brads was cheaper that
Batteries Plus so I went with Brads. Batteries Plus was the next
cheapest I could find for Trojans. Many
places that sell batteries
actually charge an extra "core" charge of up to 25 bucks a battery. You
can avoid this fee by giving them your old dead car/ lawn mower/ telco
batteries. Always
ask if there is a core charge and if they accept core exchange. And
remember to save your old batteries, they are actually worth
something.
**battery UPDATE** On September 19, 2008 I bought (8) more
batteries. Trojans were too expensive (around $300 each for L16H's) so
I bought (8) DEKA-L16 (320AH) batteries for $187 each from
www.batteriesplus.com. They did not require any core charge and they
threw in (for free) , the 18 connectors I needed to string the 8
in series and then in parallel with my current Trojans.
Note* -- I
just got word that Trojan L16H
batteries are now (Aug 2007) around $330 each!!!! Wow. I spoke with
Batteriesplus.com and they have an equivilent battery made by East Penn
for about $230 each but the 20 hour amp rating is about 370 compared to
the Trojan 20hr rating of 420 amps. I would get East Penn batteries now
if I had to until lead prices come back down. Batteries plus has free
delivery and have no core charge.
Note*
-- when pulling wire with your fish tape remember to
use plenty of lubricant - ie dishwashing detergent (cheap and
effective) or wire pulling soap (more expensive)
Note* -- I purchased
a copy of the NEC
2005 from the department of Insurance. If you are a do-it-yourselfer
like me you will be referring
back to this book frequently so you can pass State
inspection. The code book was about $80
including shipping. For a Electrical code book go to one of the
following links:
http://www.iccsafe.org/e/prodshow.html?prodid=5000L05&stateInfo=ppajZbnThlninRan8626|6
or
http://www.iccsafe.org/e/prodcat.html?catid=C-A&pcats=ICCSafe,C
or
http://www.iccsafe.org
then
click on iccstore drop down link at top of page, then click code
books
link.
NEXT PAGE >>